 Save
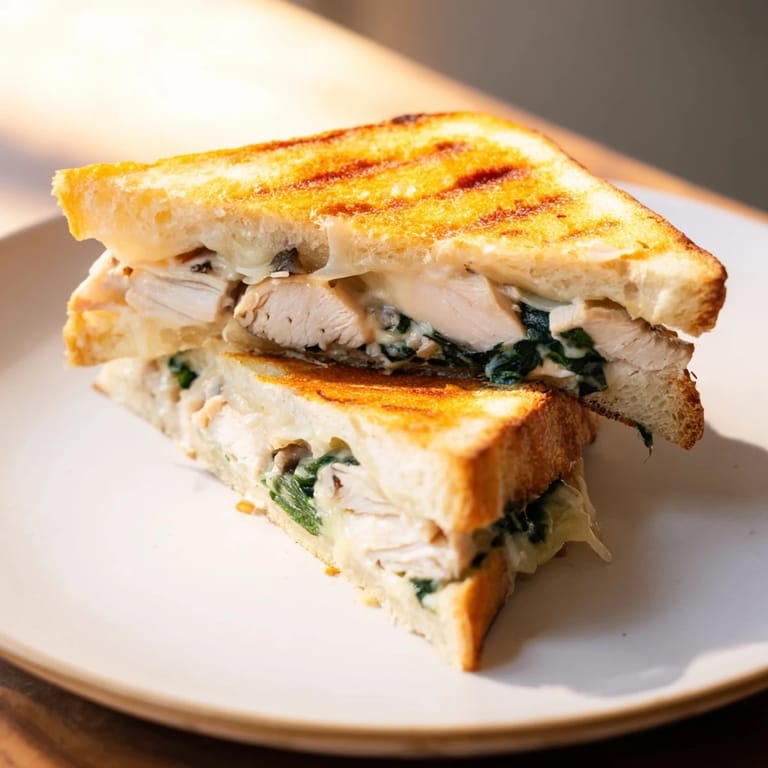
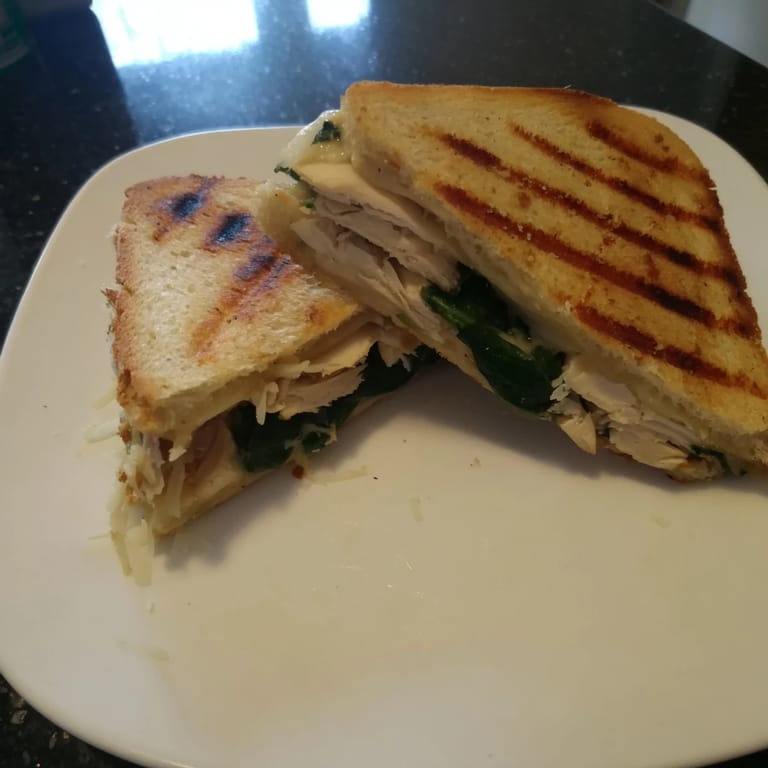
Save My husband brought home a panini press from a yard sale one Saturday morning, and I had no idea what to do with it. That evening, I grilled some leftover chicken breasts, pulled out whatever cheese was hiding in the drawer, and grabbed a handful of spinach before it wilted. The first press left golden grill marks across the bread, and the smell of garlic butter filling the kitchen made me realize this little appliance was about to earn its counter space. We ate standing up, cheese stretching between bites, and I knew I'd be making these paninis on repeat.
I started making these paninis on weeknights when my kids were too hungry to wait for anything complicated. One evening, my daughter watched me layer the chicken and cheese, then asked if she could press the sandwich herself. She stood on a step stool, carefully closing the lid, and her face lit up when she saw the grill marks appear. Now she insists on being the official panini presser, and I let her because it turns a regular dinner into something we do together.
Ingredients
- Boneless, skinless chicken breasts: These grill up quickly and slice beautifully, but if they are thick, pound them out a bit so they cook evenly and do not dry out.
- Olive oil: Brushing the chicken with oil before grilling keeps it juicy and helps the seasonings stick without sliding off.
- Salt, black pepper, and dried Italian herbs: This simple trio gives the chicken just enough flavor to stand up to the garlic butter and cheese without overpowering anything.
- Unsalted butter: Softened butter spreads easily and lets you control the salt level, especially since the cheeses add plenty of their own.
- Garlic, minced: Fresh garlic mixed into the butter transforms ordinary bread into something you will want to eat on its own.
- Fresh parsley: A little greenery in the garlic butter brightens everything and makes the kitchen smell like an Italian bistro.
- Rustic Italian or sourdough bread: Sturdy bread holds up to the press and soaks in the garlic butter without falling apart or getting soggy.
- Fresh baby spinach: It wilts just enough under the heat and adds a pop of color and a hint of earthiness that balances the richness.
- Shredded mozzarella cheese: Melts into creamy, stretchy perfection and binds everything together in every bite.
- Grated Parmesan cheese: Adds a sharp, nutty depth that keeps the panini from tasting one note and gives the crust a little extra crispness.
Tired of Takeout? 🥡
Get 10 meals you can make faster than delivery arrives. Seriously.
One email. No spam. Unsubscribe anytime.
Instructions
- Preheat the grill:
- Get your grill pan or outdoor grill going over medium high heat so it is ready to sear the chicken as soon as you season it. A hot grill gives you those beautiful char marks and locks in the juices.
- Season and grill the chicken:
- Brush the chicken breasts with olive oil, sprinkle on the salt, pepper, and Italian herbs, then grill them for 5 to 6 minutes per side until they are cooked through and no longer pink in the center. Let them rest for 5 minutes before slicing so the juices redistribute and every slice stays moist.
- Make the garlic butter:
- In a small bowl, mix the softened butter with minced garlic and chopped parsley until everything is evenly combined. This spread is the secret to turning plain bread into something you will crave.
- Assemble the sandwiches:
- Lay out your bread slices and spread garlic butter on one side of each piece, then flip four slices over and layer on the sliced chicken, spinach, mozzarella, and Parmesan before topping with the remaining bread slices, buttered side facing out. The buttered outside is what gets golden and crispy in the press.
- Press and cook:
- Heat your panini press or a large skillet over medium heat, then place the sandwiches in the press or skillet, using a heavy pan to weigh them down if you do not have a press. Cook for 3 to 5 minutes per side until the bread is golden brown and the cheese is fully melted and gooey.
- Slice and serve:
- Cut each panini in half while it is still hot so the cheese stretches and the steam escapes. Serve immediately and watch them disappear.
 Save
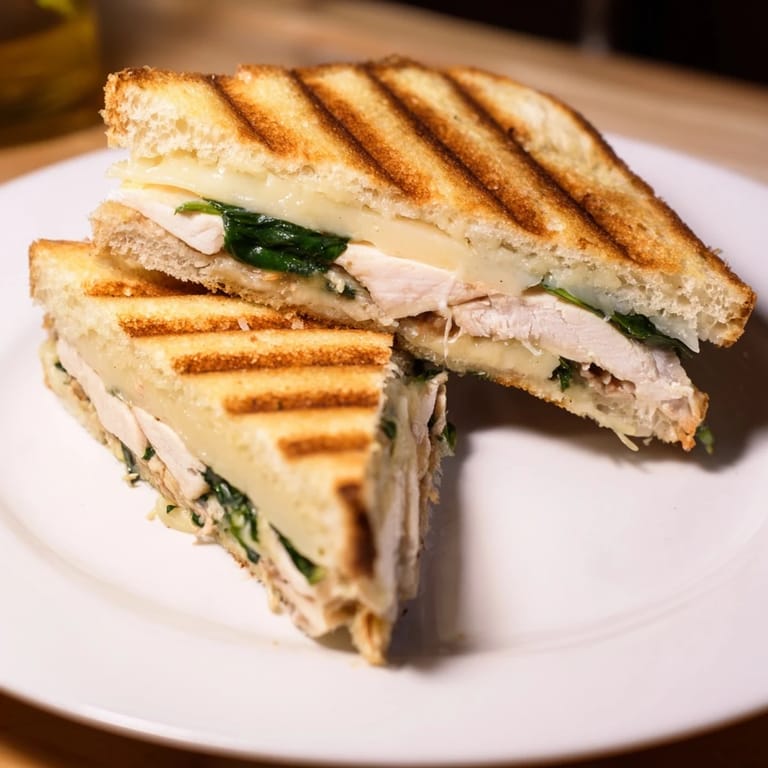
Save One afternoon, I made a batch of these paninis for a casual lunch with friends, and everyone kept asking for the recipe. I realized it was not just the food but the way we all stood around the counter, watching the press do its magic, laughing about whose sandwich would come out the prettiest. These paninis turn a simple meal into an excuse to gather, and that is when food matters most.
Choosing Your Bread
The bread you pick makes or breaks a panini because it has to hold up under pressure without turning into a crumbly mess. I have tried soft sandwich bread and it just smooshed flat and got soggy, so now I stick with rustic Italian loaves or sourdough that have a chewy crust and enough structure to crisp up beautifully. Ciabatta works too, but slice it horizontally so you get a good surface area for layering. Day old bread actually works better than fresh because it has less moisture and crisps up faster without steaming inside the press.
Making It Without a Panini Press
You do not need a panini press to make a great panini, and I have been using a cast iron skillet and a smaller heavy pan for years. Just heat your skillet over medium heat, place the sandwich in, then press down with another pan weighted with a few cans of beans or tomatoes. Flip it after a few minutes and press again until both sides are golden and the cheese is melted. The key is steady, even pressure and not rushing the heat, or the bread will burn before the cheese gets gooey.
Storing and Reheating Leftovers
Paninis are best eaten right away, but if you have leftovers, wrap them tightly in foil and store them in the fridge for up to two days. To reheat, skip the microwave because it will make the bread rubbery and sad. Instead, heat a skillet over medium low, place the panini in, and press it gently with a spatula until the bread crisps back up and the cheese softens again.
- You can also reheat them in a 350 degree oven for about 10 minutes, wrapped loosely in foil to keep the bread from drying out.
- If you want to prep ahead, assemble the sandwiches without buttering the outside, wrap them in plastic wrap, and store them in the fridge for up to a day before pressing.
- Leftover grilled chicken keeps for three days in the fridge, so you can grill extra and have panini ready to assemble in minutes.
 Save
Save Every time I make these paninis, I am reminded that the best meals do not have to be complicated or take hours. They just need good ingredients, a little bit of care, and the willingness to stand at the counter and enjoy the process.
Recipe Guide
- → Can I prepare the panini ahead of time?
You can assemble the panini up to 2 hours ahead and refrigerate it wrapped in foil. Press it directly from the fridge, adding 1-2 extra minutes to the cooking time.
- → What cheese works best for this panini?
Mozzarella melts beautifully and stays creamy, but provolone adds a slightly smoky flavor. You can also use fontina or a blend of both for richer taste.
- → How do I prevent the bread from drying out?
The garlic butter coating seals the bread and keeps it moist. Don't skip this step, and avoid over-pressing the panini, which can squeeze out the filling.
- → Can I use a regular skillet instead of a panini press?
Yes, place the sandwich in a heated skillet and weight it down with a heavy cast-iron pan or foil-wrapped bricks. Cook 3-5 minutes per side until golden.
- → What's the best way to slice the chicken for even cooking?
Pound the chicken breasts to uniform thickness before grilling, about 3/4 inch thick. This ensures even cooking and prevents dry edges.
- → Can I make this without dairy?
Substitute dairy-free cheese and vegan butter for the garlic butter spread. The flavor will be lighter, but the panini remains delicious and satisfying.