 Save
Save My skillet was too hot the first time I tried this, and I watched in mild panic as golden breadcrumbs turned dark brown in seconds. I learned fast: medium-high heat, patience, and a good panko crust will give you that restaurant-quality crunch at home. Now these cutlets show up on my table at least twice a month, always with that bright green swirl of pesto on top. Its become my go-to when I want something impressive without the fuss.
I made these for a friend who swore she didnt like chicken breast because it always came out dry. She took one bite, paused, then asked for the recipe before she even finished chewing. That moment reminded me how much technique matters: pounding the meat thin, not overcooking it, and letting a great crust protect the juices inside. We ended up eating on the back porch with lemon wedges and too much wine, and she still texts me photos every time she makes them.
Ingredients
- Boneless, skinless chicken breasts: Pounding them to half an inch keeps cook time short and ensures they stay tender, not rubbery.
- Salt and black pepper: Season generously before breading so the flavor goes all the way through, not just on the surface.
- Eggs and milk: The milk thins the egg just enough to create an even, clingy coating that holds the breadcrumbs in place.
- All-purpose flour: This first dry layer gives the egg something to grip onto, it's the glue of the whole operation.
- Panko breadcrumbs: Their larger, airier flakes fry up crispier than regular breadcrumbs and stay crunchy longer.
- Grated Parmesan cheese: It adds a salty, nutty backbone to the crust and helps it brown beautifully.
- Dried Italian herbs: Optional, but a teaspoon brings a subtle herby note that plays well with the pesto.
- Olive oil: Use enough to generously coat the bottom of the pan, shallow frying gives you that golden crust without deep-frying mess.
- Basil pesto: Store-bought works perfectly here, just look for one with good color and real basil listed first.
- Fresh basil leaves and lemon wedges: A squeeze of lemon at the table cuts through the richness and makes everything taste brighter.
Tired of Takeout? 🥡
Get 10 meals you can make faster than delivery arrives. Seriously.
One email. No spam. Unsubscribe anytime.
Instructions
- Season the chicken:
- Lay your chicken breasts on a cutting board and sprinkle both sides with salt and freshly ground pepper. Dont be shy, this is your only chance to season the meat itself.
- Set up your breading station:
- Grab three shallow bowls or plates and fill them in order: plain flour in the first, beaten eggs mixed with milk in the second, and panko tossed with Parmesan and Italian herbs in the third. This assembly line makes coating fast and neat.
- Coat each cutlet:
- Dredge a chicken piece in flour and shake off the excess, dip it into the egg mixture until fully coated, then press it into the panko blend, patting gently so the crumbs stick all over. Repeat with the remaining cutlets.
- Heat the oil:
- Pour olive oil into a large skillet and set it over medium-high heat. Let it warm until it shimmers but doesnt smoke, you want a steady sizzle when the chicken hits the pan.
- Fry the cutlets:
- Lay the breaded chicken in the skillet without crowding, working in batches if needed. Cook for 3 to 4 minutes per side until the crust turns deep golden and the chicken is cooked through, then transfer to a paper towel-lined plate.
- Top with pesto and serve:
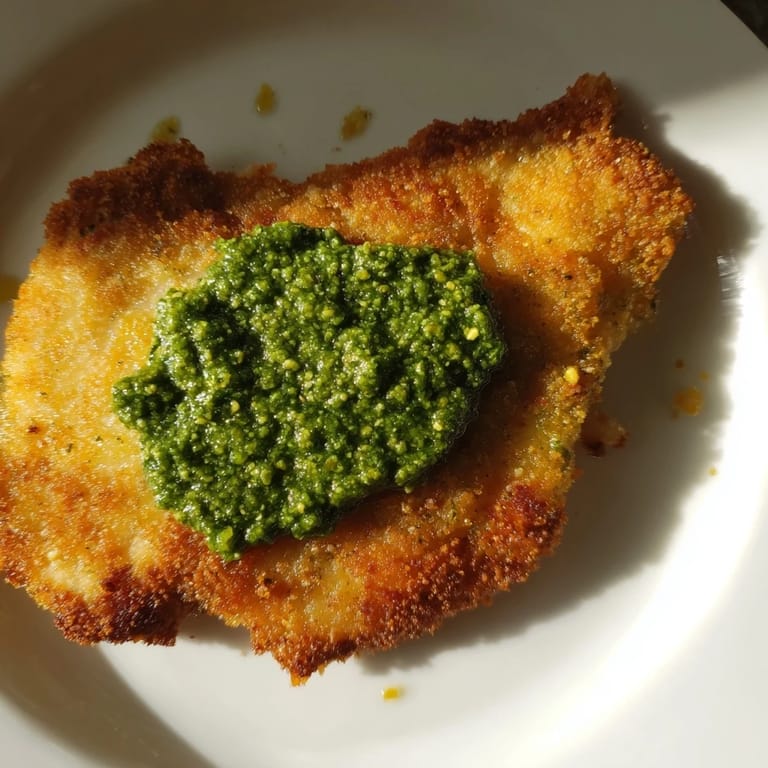
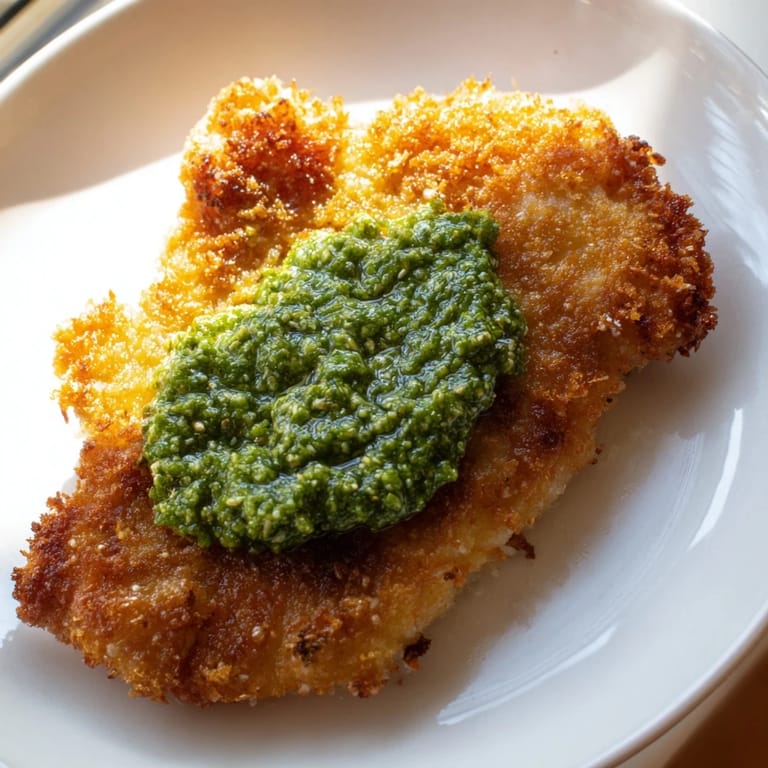
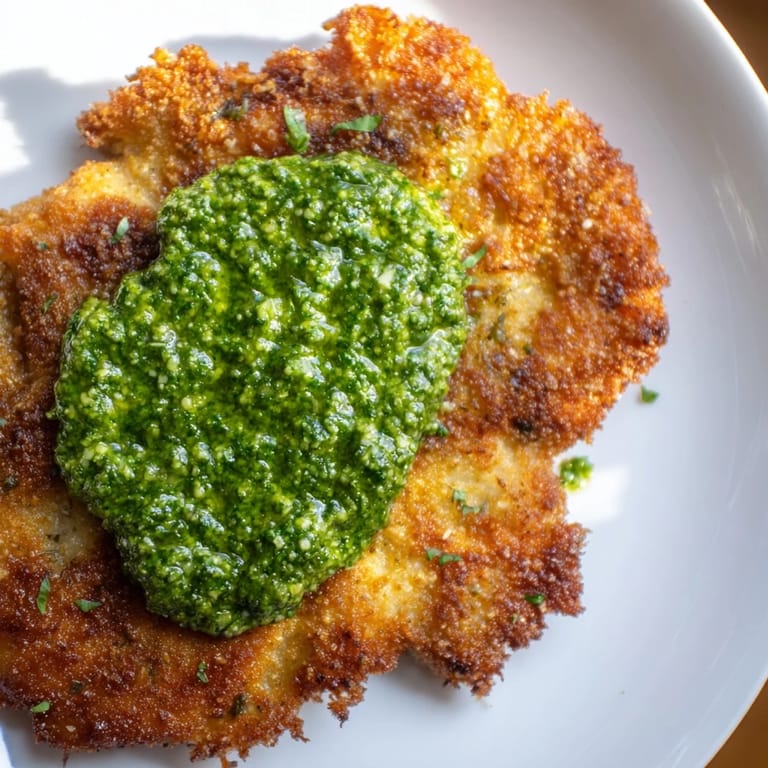
- Arrange the crispy cutlets on a platter and spoon a generous dollop of pesto over each one. Garnish with fresh basil leaves and serve with lemon wedges on the side for squeezing.
 Save
Save The first time I served these at a casual dinner party, someone asked if Id ordered takeout from that Italian place downtown. I laughed and showed them my flour-dusted counter as proof. That night, watching everyone go back for seconds and drag their forks through the last smears of pesto, I realized how a simple weeknight recipe can feel like an occasion when the textures and flavors just work. Its not fancy, but it always feels special.
Choosing Your Pesto
Store-bought pesto is my usual move because its fast and consistent, but homemade is worth it if you have fresh basil on hand. Look for jars with a vibrant green color and basil listed as the first ingredient, some brands lean too heavy on oil and cheese. If youre making your own, keep it loose and spoonable rather than thick, it should drape over the chicken, not sit in a stiff mound. I once used a red pesto made with sun-dried tomatoes and it was delicious in a completely different way, so dont be afraid to experiment.
Getting the Crust Right
Panko is the secret weapon here because its flakier and lighter than regular breadcrumbs, which can turn dense and soggy. I tried this recipe with Italian-style crumbs once and the crust came out fine but not as shatteringly crisp. Mixing Parmesan directly into the panko gives you little pockets of cheesy flavor in every bite and helps the coating brown faster. If your breadcrumbs look pale after a few minutes in the pan, your heat might be too low, bump it up just a notch and listen for that steady sizzle.
Serving and Pairing Ideas
These cutlets are rich enough to stand on their own, but I usually serve them with something light and acidic to balance the crispy, cheesy crust. A simple arugula salad with lemon vinaigrette is perfect, or you can go classic with a side of buttered pasta tossed with a little extra pesto. Roasted vegetables, especially zucchini or cherry tomatoes, add color and freshness to the plate. If youre pouring wine, a crisp Pinot Grigio or a dry Vermentino cuts through the richness beautifully.
- Slice leftovers and tuck them into a ciabatta roll with arugula and a smear of mayo for an excellent next-day sandwich.
- Try swapping the basil pesto for sun-dried tomato or arugula pesto if you want a different flavor profile.
- If youre feeding kids, serve the pesto on the side so they can control how much green stuff ends up on their plate.
 Save
Save This is the kind of recipe that makes weeknight cooking feel less like a chore and more like something you actually look forward to. Once you get the breading rhythm down, youll find yourself making these cutlets on repeat, maybe with different toppings, maybe with turkey, but always with that satisfying crunch.
Recipe Guide
- → How do I achieve extra crispiness on the chicken cutlets?
Use panko breadcrumbs instead of regular breadcrumbs—they're larger and create a crunchier coating. Ensure your oil is hot enough before frying and don't crowd the skillet, which lowers the temperature and causes oil absorption.
- → Can I prepare the cutlets ahead of time?
Yes, you can bread the cutlets up to 2 hours ahead and refrigerate them on a baking sheet. This actually helps the coating adhere better. Fry them fresh when ready to serve for optimal crispiness.
- → What's the best way to pound chicken breasts evenly?
Place chicken between plastic wrap or in a plastic bag to minimize splashing. Use the flat side of a meat mallet for gentle, even pressure. Pound from the center outward until the cutlet reaches ½-inch thickness throughout.
- → Can I use homemade pesto instead of store-bought?
Absolutely. Homemade pesto is delicious and allows you to control ingredients and allergen content. Blend fresh basil, garlic, pine nuts (or walnuts), Parmesan, and olive oil to your preferred consistency.
- → What are good side dishes to serve with these cutlets?
A light arugula salad with lemon vinaigrette, buttered pasta, roasted vegetables, or risotto complement the crispy cutlets beautifully. The acidity of lemon works particularly well with the rich pesto topping.
- → How do I know when the chicken is cooked through?
Fry for 3–4 minutes per side until golden brown. Ensure the internal temperature reaches 165°F (74°C) using a meat thermometer for safety. The juices should run clear when pierced with a fork.